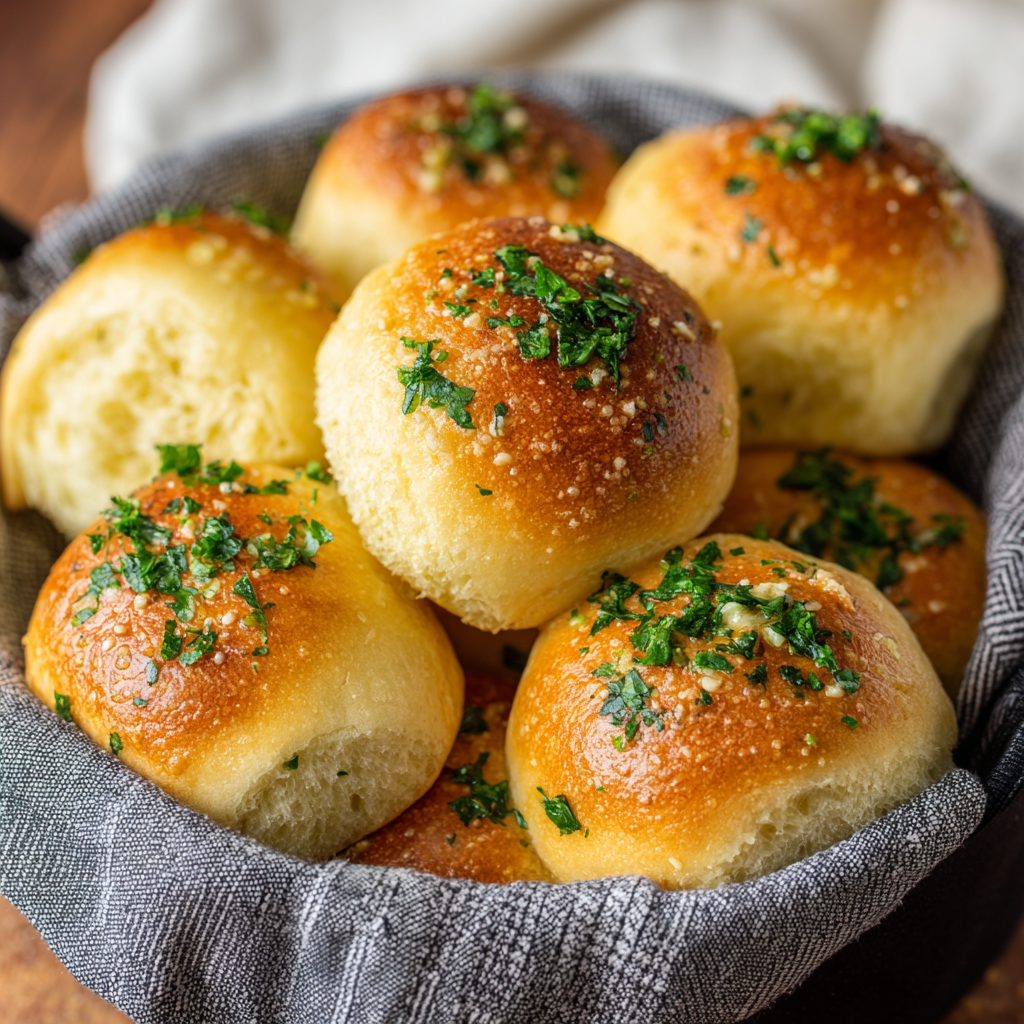
The Ultimate Guide to Homemade Garlic Bread Rolls: A Recipe for Perfection
There are few scents in this world as universally comforting and irresistibly inviting as the aroma of garlic and butter toasting on warm bread. It’s a smell that promises satisfaction, a prelude to a meal that feels like a hug from the inside. While a loaf of garlic bread is a classic for a reason, today, we are elevating that experience to a new level of delightful, shareable, and utterly perfect perfection: the Garlic Bread Rolls.
These are not merely dinner rolls with a dab of butter. No, these are soft, fluffy, cloud-like pillows of dough, intrinsically woven with the essence of fresh garlic and herbs, then baptized in a generous glaze of more garlic-infused butter straight from the oven. They are the star of the dinner table, the appetizer that disappears in minutes, and the side dish that often upstages the main course. This guide is your definitive resource for creating these heavenly morsels at home, demystifying the process and ensuring you achieve bakery-quality results on your very first try.
More breakfast ideas you’ll love
Why You Need to Make Homemade Garlic Bread Rolls
Before we dive into the flour-dusted details, let’s address the fundamental question: why go through the effort of making Garlic Bread Rolls from scratch when the freezer aisle offers a convenient alternative?
-
Unbeatable Freshness & Texture: A homemade roll possesses a warmth, softness, and ethereal quality that a pre-made, par-baked roll can never replicate. The crust is delicately golden and slightly crisp from the egg wash, giving way to a tender, airy crumb that melts in your mouth.
-
Control Over Ingredients: You are the master of your garlic destiny. You can use the freshest garlic, high-quality butter, and vibrant, garden-fresh parsley. There are no preservatives, unpronounceable additives, or excessive sodium—just pure, wholesome, and delicious ingredients.
-
The Aroma Therapy of Baking: The process of baking bread is a reward in itself. The yeasty fragrance of the dough as it rises, followed by the transformative, mouth-watering scent of garlic and bread baking together, is a form of culinary therapy that fills your home with an atmosphere of warmth and anticipation.
-
Versatility: These Garlic Bread Rolls are incredibly versatile. They are the perfect partner for a hearty pasta dish like spaghetti carbonara, a essential dipper for a creamy tomato soup, a stellar addition to a holiday feast, or a magnificent base for miniature sliders.
Deconstructing the Perfect Garlic Bread Rolls Recipe
Creating the ultimate Garlic Bread Rolls is a journey of layering flavors and mastering simple bread-making techniques. Let’s break down the provided recipe and explore the “why” behind each step to empower you as a baker.
Equipment: Keeping it Simple
You don’t need a kitchen full of fancy gadgets. The essentials are:
-
A Stand Mixer: While you can knead by hand, a stand mixer with a dough hook makes the process effortless and ensures a perfectly kneaded, smooth dough.
-
A 9×13 Baking Pan: This size is ideal for creating a pan of 12 rolls that will bake up soft-sided and pull-apart perfect.
-
Basic Kitchen Tools: Mixing bowls, a small pot, a pastry brush, and a kitchen scale.
The Ingredients: A Symphony of Simple Components
Every ingredient in this recipe for Garlic Bread Rolls plays a crucial role:
-
All-Purpose Flour: The structural backbone of our rolls. The recipe calls for a specific measurement, but the note about adding flour gradually is key. Flour hydrates differently depending on humidity, so a “workable, soft, and tacky” dough is the goal, not a rigid, dry one.
-
Instant Yeast: The tiny miracle worker. Instant yeast doesn’t require proofing in water and can be mixed directly with the dry ingredients, making the process quicker and more straightforward.
-
Milk, Egg & Butter: The tenderizing team. The fat in the milk and butter, along with the enriching properties of the egg, work together to create a rich, soft crumb and a tender texture, distinguishing these from a crusty artisan loaf.
-
Fresh Garlic: The undisputed star. Using fresh minced garlic, both in the dough and in the finishing butter, is non-negotiable for that potent, aromatic, and authentic garlic flavor that jarred or powdered versions can’t match.
-
Fresh Parsley: The herbaceous, fresh counterpoint. Parsley cuts through the richness of the butter and adds a pop of color and a subtle, clean flavor.
-
Sugar & Salt: The flavor balancers. A little sugar feeds the yeast and promotes browning, while salt is essential for enhancing all the other flavors in the roll.
The Step-by-Step Journey to Garlic Bread Roll Bliss
Follow these steps carefully, and you will be rewarded with the most incredible Garlic Bread Rolls you’ve ever tasted.
Step 1: Infusing the Butter – Building the Foundation of Flavor
We begin by melting the butter and gently cooking the minced garlic in it. This step is a game-changer. By infusing the butter with garlic before incorporating it into the dough, we are ensuring that the garlic flavor is baked into the very soul of the roll, rather than just sitting on the surface. Cooking it for just 1-2 minutes until fragrant takes the raw edge off the garlic, mellowing it into a sweet, nutty complexity. Allow this mixture to cool slightly so it doesn’t scramble the egg in the next step.
Step 2: Creating the Dough – The Art of Kneading
In the bowl of your stand mixer, combine the dry ingredients: flour, parsley, sugar, yeast, and salt. This ensures an even distribution before the liquids are introduced. Then, add the warmed milk (110°F is the sweet spot for activating yeast without killing it), the room-temperature egg, and the glorious, prepared garlic butter.
Attach the dough hook and begin kneading on low speed. The magic happens here. Over 10-12 minutes, the shaggy, sticky mass will transform into a smooth, soft, and elastic ball. It should feel tacky to the touch but not stick to your fingers excessively. This is where you use your judgment: if it’s too sticky, add one tablespoon of flour at a time until it becomes workable. The windowpane test—gently stretching a small piece of dough to see if it forms a thin, translucent membrane without tearing—is a great indicator of proper gluten development.
Step 3: Shaping and the First Rise – A Lesson in Patience
This is where we create the signature roll shape. Dividing the dough into 12 equal portions (using a kitchen scale for 67-gram portions guarantees even baking) is highly recommended. To shape, take a portion of dough and use your hand to cup and roll it on an un-floured surface, creating tension on the top surface. Pinch the seam at the bottom to seal it tightly. This technique gives you that beautiful, smooth, bakery-style dome.
Place each shaped ball into your greased 9×13 pan. They should be cozy but not crammed, with a little space to expand. Cover the pan with plastic wrap or a clean kitchen towel and place it in a warm, draft-free spot. Let the dough rise until doubled in size, which can take 1-2 hours. This slow fermentation is where flavor develops, so don’t rush it!
Step 4: Baking to Golden Perfection
Once the rolls are puffy and nearly touching, preheat your oven to 350°F/180°C. Before baking, we brush the tops with a beaten egg wash. This is the secret to that beautiful, deep golden-brown, glossy crust that is visually stunning and adds a subtle richness. Bake for 20-30 minutes, until the tops are a rich golden brown and the internal temperature registers around 190°F (88°C) on an instant-read thermometer.
Step 5: The Grand Finale: The Garlic Butter Bath
While the rolls are baking, prepare the second wave of garlic flavor. Melt more butter with more fresh garlic, cooking it just until fragrant. Off the heat, stir in the fresh parsley. The moment the Garlic Bread Rolls emerge from the oven, glistening and hot, you must immediately brush them lavishly with this garlic butter. The hot rolls will act like a sponge, soaking up the flavorful butter into their nooks and crannies. A final sprinkle of flaky sea salt adds a delightful crunch and enhances every single flavor note.
Customizing Your Garlic Bread Rolls
The basic recipe is a masterpiece, but it’s also a fantastic canvas for your culinary creativity.
-
Cheese Lover’s Dream: Fold 1/2 cup of finely grated Parmesan or sharp cheddar cheese into the dough during the last minute of kneading. After the final garlic butter brush, sprinkle with more cheese.
-
Herb Garden Delight: Add other fresh herbs like chopped chives, thyme, or rosemary to the dough along with the parsley.
-
A Spicy Kick: Add 1/4 teaspoon of crushed red pepper flakes to the garlic butter for a subtle, warming heat.
-
Everything Bagel Twist: Before the final rise, brush the rolls with the egg wash and sprinkle generously with everything bagel seasoning for a savory, oniony, and sesame-packed crust.
Serving and Storing Your Masterpiece
Serve these Garlic Bread Rolls warm. They are at their absolute peak within an hour of leaving the oven, when the exterior has a slight crispness and the interior is steamy and soft.
To store, allow any leftover rolls to cool completely, then place them in an airtight container or zip-top bag at room temperature for up to 2 days. To re-crisp and warm them, place them in a 350°F oven for 5-10 minutes or air fry for 3-4 minutes. For longer storage, you can freeze the baked and cooled rolls for up to 3 months. Thaw and reheat as described above.
Final Thoughts
The journey of making Garlic Bread Rolls from scratch is a testament to the idea that the most extraordinary culinary experiences often come from the simplest, most honest ingredients. It’s a process that engages the senses—from the tactile pleasure of kneading dough to the olfactory symphony of garlic and yeast at work. While the convenience of store-bought will always have its place, it cannot compete with the profound satisfaction of pulling a pan of golden, buttery, aromatic rolls from your own oven.
These Garlic Bread Rolls are more than just a side dish; they are an act of love, a centerpiece of comfort, and a guaranteed way to bring smiles to the table. They remind us that baking is not just about feeding the body, but also about nourishing the soul. So, preheat your oven, mince that garlic, and embark on this delicious endeavor. The result is not just a batch of rolls, but a creation that will have everyone asking for the recipe, and a memory of a home filled with the best smell in the world.