The Ultimate Guide to Crafting Authentic Pastel de Nata Recipe (Portuguese Custard Tarts): A Journey from Lisbon to Your Kitchen
The scent of buttery pastry, caramelized sugar, and warm cinnamon wafting through a Lisbon alleyway is more than just a pleasant aroma; it’s the olfactory signature of Portugal’s most beloved culinary export: the Pastel de Nata. These iconic custard tarts, with their flaky, crisp shell and luscious, creamy center—often kissed with a charred, blistered top—are a masterpiece of contrast. For the home baker, replicating this treasure can seem daunting, shrouded in the mystique of ancient monastery recipes. But fear not. This comprehensive guide will demystify the process, providing you with a detailed, approachable, and deeply satisfying Pastel de Nata Recipe (Portuguese Custard Tarts) that brings the heart of Portugal to your table.
A Slice of History: The Humble Origins of a National Icon
Before we preheat the oven, a little context elevates the baking experience. The Pastel de Nata’s story begins in the early 19th century at the Jerónimos Monastery in the Belém district of Lisbon. Here, monks and nuns used egg whites to starch their religious garments, leaving a surplus of egg yolks. These yolks were ingeniously transformed into rich custards and pastries. Following the Liberal Revolution of 1820, monasteries closed, and the recipe was sold to the nearby sugar refinery. In 1837, the Fábrica de Pastéis de Belém opened, beginning commercial production of the “Pastéis de Belém.” The original recipe remains a closely guarded secret to this day, known only to a handful of master confectioners.
More breakfast ideas you’ll love
This history is key to understanding the soul of the tart: it is born of frugality, devotion, and ingenuity. While we may not have the monks’ secret, we can capture the essential spirit—a sublime marriage of texture and taste.
Deconstructing the Perfect Pastel de Nata: Texture and Flavor
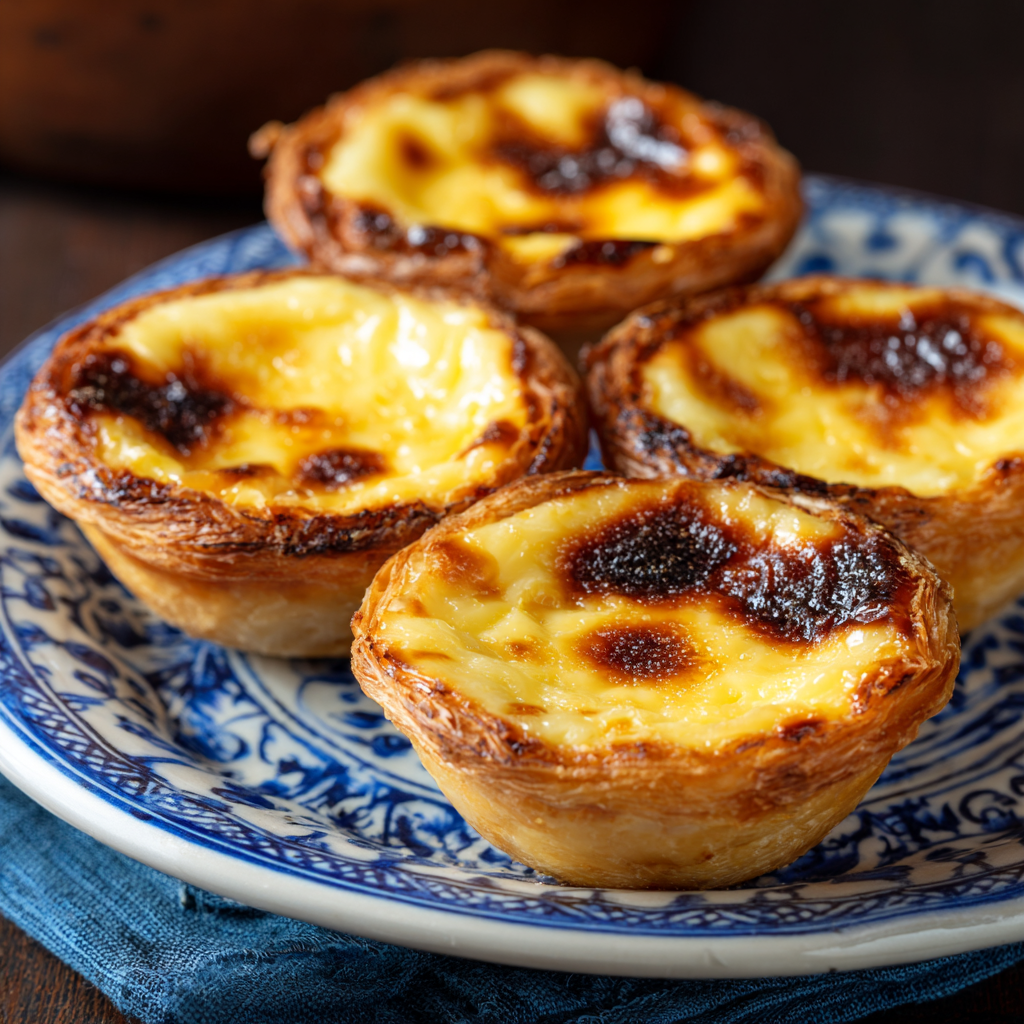
A perfect Pastel de Nata is a study in harmony. The shell must be shatteringly crisp and impossibly flaky, with visible, buttery layers. The custard should be smooth, creamy, and just sweet enough, with a subtle vanilla-citrus aroma from the classic infusion. The top is non-negotiable: it must be caramelized, with a characteristic leopard spotting of dark brown and black blisters from a fiercely hot oven. This contrast—the cold, creamy custard against the warm, crisp pastry—is the magic moment.
The Philosophy of Our Approachable Pastel de Nata Recipe (Portuguese Custard Tarts)
Traditional recipes often involve making a massa folhada (puff pastry) from scratch, a labor of love involving multiple folds and rests. For the modern home cook, we strike a balance between authenticity and achievability. We use high-quality, store-bought puff pastry as a brilliant shortcut, focusing our energy on the soul of the tart: the custard. This method ensures spectacular results without requiring professional pastry skills.
Pastel de Nata Recipe (Portuguese Custard Tarts)
Prep Time: 20 minutes (plus thawing time)
Cook Time: 25 minutes
Chilling/Steeping Time: 25 minutes
Total Time: 1 hour 10 minutes (active)
Yield: 12 tarts
Category: Dessert
Method: Baking
Cuisine: Portuguese
Ingredients
For the Pastry:
-
1 sheet (approx. 8 oz or 225g) of all-butter frozen puff pastry, thawed according to package instructions (all-butter is crucial for flavor and flakiness)
-
A light dusting of all-purpose flour, for the work surface
For the Custard Filling:
-
3/4 cup (150g) granulated sugar
-
1/3 cup (40g) all-purpose flour
-
1/4 teaspoon of fine sea salt
-
1 1/4 cups (300ml) whole milk (do not substitute for lower fat)
-
1 high-quality cinnamon stick
-
The peel of 1 large lemon, removed in wide strips with a vegetable peeler (avoid the bitter white pith)
-
6 large egg yolks (save the whites for another use like meringues!)
-
1 teaspoon of pure vanilla extract (a modern, but welcome, accent)
For Serving (Traditional):
-
Ground cinnamon
-
Powdered sugar (icing sugar)
Equipment: Standard 12-cup muffin tin, rolling pin, fine mesh sieve, saucepan, whisk.
Step-by-Step Instructions: Crafting Your Masterpiece
Step 1: Preparing the Pastry Shells (The Foundation)
The goal here is to create visible, spiral layers in the tart shell, which will puff and separate dramatically in the high heat.
-
Thaw & Roll: Ensure your puff pastry is fully thawed but still cold. On a lightly floured surface, gently roll the sheet into a rectangle roughly 12×9 inches. This extra rolling ensures the final pastry is thin enough.
-
The Tight Roll: Starting from one of the shorter ends, roll the pastry up tightly into a log, like a jelly roll or Swiss roll. Try to keep it as uniform as possible. This log of dough is your secret to layered shells.
-
Chill & Slice: Wrap the log in plastic wrap and place it in the freezer for 15 minutes to firm up. This makes slicing cleaner. Using a sharp serrated knife, slice the log into 12 equal pieces (about 3/4-inch each).
-
Forming the Cups: Take one dough round and place it cut-side down into a cup of an ungreased muffin tin. The spiral layers should be facing up. Using your thumb, press the center down and out, while using the fingers of your other hand to stretch and press the dough up the sides. The dough should come about 1/8-inch above the rim of the cup. Aim for a thin, even layer. Repeat with all 12 pieces. Place the entire tin in the refrigerator to chill while you make the custard. A cold pastry shell meeting hot custard and oven is critical for structure.
Step 2: Crafting the Luscious Custard (The Soul)
This is where the flavor is built. Patience and attention here guarantee a smooth, silky filling.
-
Create the Base: In a medium saucepan, whisk together the sugar, flour, and salt. Add just a few tablespoons of the milk to form a smooth, thick paste. This prevents the flour from lumping later.
-
Infuse the Milk: Whisk in the remaining milk until fully incorporated. Add the cinnamon stick and strips of lemon peel. Place the saucepan over medium heat.
-
Cook to Thicken: Cook, whisking constantly, until the mixture thickens to the consistency of a very thick pancake batter or a loose pudding. It should coat the back of a spoon and leave a clear trail when you run a finger through it. This usually takes 5-8 minutes after it reaches a simmer. Do not let it boil vigorously.
-
Steep for Flavor: Remove the pan from the heat. Cover and let the mixture steep for 15 minutes. This allows the cinnamon and lemon to infuse the milk deeply, creating that classic, aromatic backdrop.
-
Temper the Egg Yolks: In a separate medium bowl, whisk the 6 egg yolks and vanilla extract until smooth and slightly pale. After steeping, remove the cinnamon stick and lemon peel from the warm milk mixture. Slowly, while whisking the egg yolks vigorously, drizzle in about 1/3 of the warm milk mixture to gently raise the temperature of the yolks (this is called tempering and prevents scrambled eggs).
-
Combine and Strain: Now, pour the tempered yolk mixture back into the saucepan with the remaining milk, whisking constantly. Return the saucepan to low heat and cook for another 1-2 minutes, stirring non-stop, until the custard is just thickened enough to coat a spoon. It will thicken more as it cools. Immediately strain the custard through a fine-mesh sieve into a clean bowl or large jug. This step is non-negotiable for a flawlessly smooth texture.
-
Cool Slightly: Let the custard sit at room temperature for about 10 minutes, stirring occasionally to prevent a skin from forming. It should be warm, not hot, when you pour it into the pastry shells.
Step 3: The Blistering Hot Bake (The Transformation)
The extreme heat is what creates the signature texture and appearance.
-
Preheat Aggressively: Place a baking sheet on a middle rack in your oven (to catch any drips) and preheat your oven to 500°F (260°C). If your oven has a convection setting, use 475°F (245°C). The oven must be at full, screaming heat.
-
Fill the Shells: Remove the chilled pastry shells from the fridge. Give the custard a final stir and carefully pour it into the shells, filling each one about ¾ full. Do not overfill.
-
The Fiery Bake: Carefully place the muffin tin on the preheated baking sheet in the oven. Bake for 12-17 minutes. Watch closely. The custard will puff up dramatically, and the tops will caramelize and develop those iconic blackened spots. The pastry should be deep golden brown and crisp.
-
The Cooling Ritual: Remove the tarts from the oven. Let them cool in the tin for exactly 5 minutes—this allows the custard to set slightly. Then, using a small offset spatula or knife, gently transfer them to a wire rack. This stops the cooking and prevents the bottoms from steaming and becoming soggy.
Step 4: Serving and Savoring (The Reward)
-
Serve Warm or Room Temperature: Pastéis de Nata are best enjoyed the day they are made. They are traditionally served slightly warm or at room temperature.
-
The Traditional Dusting: Just before serving, offer a small shaker of ground cinnamon and powdered sugar for your guests to dust over their tart. The classic Portuguese way is a duo of cinnamon and powdered sugar.
-
The Perfect Pairing: Enjoy with a strong, dark Portuguese espresso (a bica) or a glass of Port wine. The bitterness of the coffee contrasts beautifully with the sweet, creamy tart.
The Ultimate Guide to Crafting Authentic Pastel de Nata Recipe (Portuguese Custard Tarts): A Journey from Lisbon to Your Kitchen

These iconic Portuguese custard tarts are creamy, sweet, and perfectly flaky. With a golden, blistered top and a tender puff pastry shell, they’re a delightful treat for dessert or afternoon tea. Making them at home might seem fancy, but with a few simple steps, you’ll have authentic tarts that rival any bakery.
Ingredients
For the pastry:
-
1 sheet frozen puff pastry, thawed
-
Flour for dusting
For the custard filling:
-
3/4 cup (150 g) granulated sugar
-
1/3 cup (40 g) all-purpose flour
-
1 1/4 cups (300 ml) whole milk
-
1 cinnamon stick
-
Peel from 1 lemon (avoid white pith)
-
6 large egg yolks
Optional for serving:
-
Ground cinnamon
-
Powdered sugar
Instructions
Step 1: Prepare the Pastry
-
Roll out the thawed puff pastry on a lightly floured surface into a thin rectangle.
-
Roll it up tightly from one short end to the other, like a jelly roll.
-
Slice into 12 equal pieces.
-
Place each piece into a muffin tin cup, cut-side down. Press and stretch the dough evenly into the base and up the sides.
Step 2: Make the Custard
-
In a saucepan, whisk together sugar, flour, and a small amount of milk to form a smooth paste.
-
Add the remaining milk, cinnamon stick, and lemon peel. Cook over medium heat, whisking constantly, until it begins to simmer and thicken.
-
Remove from heat and let steep for 10 minutes.
-
Whisk the egg yolks in a separate bowl. Gradually whisk the warm milk mixture into the yolks.
-
Strain the custard through a fine mesh sieve for a smooth texture. Let cool slightly.
Step 3: Bake the Tarts
-
Preheat the oven to 500°F (260°C) or as high as it safely goes.
-
Pour the custard into the pastry cups, filling each about 3/4 full.
-
Bake 12–15 minutes until the custard puffs and the tops blister and brown. Black spots are traditional and add character.
-
Let cool in the tin for 5 minutes, then transfer to a wire rack.
Step 4: Serve
-
Dust with powdered sugar and a pinch of cinnamon if desired. Serve warm or at room temperature.
Notes
-
Puff pastry: Thaw completely and roll carefully to keep it flaky.
-
Lemon peel: Avoid the bitter white pith when peeling.
-
Custard: Whisk constantly when heating milk to prevent lumps or curdling.
-
Oven: Bake at the highest temperature possible for that signature blistered top.
-
Serving: Dust lightly with powdered sugar and cinnamon for an authentic touch
Expert Tips and Troubleshooting for Your Pastel de Nata Recipe (Portuguese Custard Tarts)
-
The Pastry is Key: All-butter puff pastry provides a richer flavor and better texture than one made with shortening. Brands like Dufour or Pepperidge Farm are widely available and excellent.
-
Custard Consistency: If your custard seems too thick after cooling, you can whisk in a tiny splash of milk. If it seems too thin, it may not have cooked long enough; you can return it to low heat for another minute.
-
Avoid Soggy Bottoms: Ensuring your pastry is cold, your oven is scorching hot, and you remove the tarts from the tin after 5 minutes are the three pillars of a crisp base.
-
No Black Spots? The black spots come from the high sugar content in the custard caramelizing under intense heat. If your tarts aren’t spotting, your oven may not be hot enough, or it may be inaccurate. An oven thermometer is a baker’s best friend.
-
Make-Ahead Strategy: You can prepare the dough logs and custard (cover surface directly with plastic to prevent a skin) up to a day in advance. Keep the dough log in the fridge and the custard in the fridge. Let the custard come to room temperature or warm gently before assembling and baking.
Final Thoughts
Embarking on the journey of making your own Pastel de Nata Recipe (Portuguese Custard Tarts) is more than just following a set of instructions; it’s an act of culinary connection. It connects you to the history of Lisbon’s monasteries, to the bustling cafes of Belém, and to the universal joy of creating something beautiful and delicious with your own hands. While our version utilizes a smart shortcut with puff pastry, the heart of the recipe—the fragrant, citrus-kissed custard and the blistering-hot bake—remains authentically Portuguese.
These tarts are a celebration of contrasts: the crisp against the creamy, the sweet against the slightly charred, the simplicity of ingredients against the complexity of flavor they create. Don’t be intimidated by the high heat or the pursuit of the perfect black spot. Embrace the process. Your kitchen will fill with an incredible aroma, and the first bite of a warm, homemade Pastel de Nata—its flaky layers shattering, its custard melting on your tongue—will be a moment of pure, unadulterated triumph