The Ultimate S’mores Cookies: A Gooey, Nostalgic Treat You Can Make All Year
There’s something magical about a classic s’more. The crackle of a graham cracker, the ooze of melting chocolate, the singed perfection of a toasted marshmallow—it’s a symphony of textures and flavors that whispers of campfires and starry nights. But what happens when that iconic taste of summer meets the beloved, chewy comfort of a homemade cookie? You get a dessert revelation: the ultimate S’mores Cookies.
These aren’t just cookies with a few add-ins; they are a deliberate, delicious deconstruction of the campfire classic, re-engineered for your oven. Imagine a soft, buttery cookie base, packed with chunks of graham cracker and pools of melted chocolate, punctuated by pockets of gooey, toasted marshmallow. Every bite is a nostalgic journey, offering the perfect balance of chew, crunch, and melt-in-your-mouth sweetness. This recipe delivers all the joy of s’mores without the need for kindling, making these S’mores Cookies a year-round indulgence.
More breakfast ideas you’ll love
Why This S’mores Cookies Recipe Works
Many s’mores cookie recipes fall short, resulting in flat cookies, burnt marshmallows, or a lack of that distinct graham flavor. This recipe is meticulously designed to overcome those pitfalls:
-
The Cornstarch Secret: Adding cornstarch to the dough is a baker’s trick for creating cookies that are supremely soft, thick, and chewy—the ideal textural canvas for our s’mores components.
-
Layered Mix-Ins: We incorporate most of the graham crackers and marshmallows into the dough for distributed flavor, but we save a portion for a strategic top-layer addition. This ensures every bite is loaded and the cookies have that classic, visually appealing s’mores look.
-
The Double Chocolate Approach: Using a blend of milk chocolate chips and semisweet chocolate chips creates a more complex, balanced chocolate flavor that isn’t overly sweet, perfectly mimicking the role of the Hershey’s bar.
-
The Toasting Finish: The brief broil at the end (carefully monitored!) transforms the top marshmallows, giving them that authentic, lightly toasted flavor and appearance that defines a true s’more.
S’mores Cookies: Ingredient Deep Dive
Understanding the role of each component helps you create the perfect batch. Here’s what you’ll need, and why it matters:
-
1 cup salted butter, softened: The foundation of flavor and texture. Salted butter enhances all the other sweet elements. Properly softened butter (leave it out for 1-2 hours) is non-negotiable for a creamy, well-aerated dough that bakes up perfectly.
-
Sugars (3/4 cup light brown sugar, packed + 1/2 cup granulated sugar): Brown sugar adds moisture, chew, and a subtle molasses note. Granulated sugar promotes spread and crisp edges. Together, they create the ideal cookie texture.
-
2 large eggs + 1 teaspoon vanilla extract: Eggs bind the dough and add richness. Vanilla is the flavor backbone that makes everything taste more “baked” and delicious.
-
Dry Ingredients (2 1/2 cups all-purpose flour, 2 tsp cornstarch, 1 tsp baking soda, 1 tsp salt): This is the structure squad. The cornstarch, as mentioned, is key for softness. Baking soda gives the lift. Salt is crucial—it balances the intense sweetness and makes the chocolate and caramel notes pop.
-
The S’mores Trinity:
-
2 cups graham crackers, broken: They provide the essential, honey-kissed crunch and authentic flavor. We use them both inside and on top.
-
2 cups mini marshmallows, divided: Mini marshmallows are ideal because they disperse evenly and melt into delightful gooey pockets. Saving some for the top allows for that signature toast.
-
The Chocolate Medley (1/2 cup milk chocolate chips, 1/2 cup semisweet chips, 2 Hershey’s bars): The chips melt into the dough, while the broken Hershey’s bars pressed on top mimic the classic s’more experience. This combination guarantees chocolate in every single bite.
-
Step-by-Step Guide to Perfect S’mores Cookies
Follow these steps closely for foolproof, bakery-worthy results every time.
Prep Time: 10 minutes | Cook Time: 11 minutes | Total Time: 21 minutes | Servings: 18 cookies
Instructions:
-
Preheat & Prep: Begin by preheating your oven to 375°F (190°C). This ensures it’s perfectly hot when the dough is ready. Line two baking sheets with parchment paper. Not only does this prevent sticking, but it makes cleanup a breeze and helps the cookies bake evenly.
-
Cream the Butter & Sugars: In a large mixing bowl, combine the softened butter, packed brown sugar, and granulated sugar. Using a hand mixer or stand mixer fitted with the paddle attachment, beat on medium-high speed for a full 2-3 minutes. The mixture should become light, pale, and fluffy. This step incorporates air, which is essential for the perfect cookie texture. Don’t rush it!
-
Incorporate Eggs & Vanilla: Add the eggs and vanilla extract to the creamed mixture. Beat on medium speed until the eggs are fully incorporated and the mixture looks smooth and cohesive, about 1-2 minutes. Scrape down the sides of the bowl as needed.
-
Combine Dry Ingredients: In a separate bowl, whisk together the all-purpose flour, cornstarch, baking soda, and salt. Whisking ensures the leavening and salt are evenly distributed throughout the flour.
-
Form the Dough: With your mixer on low speed, gradually add the dry ingredient mixture to the wet ingredients. Mix just until the flour disappears. Overmixing at this stage can lead to tough cookies. The dough will be thick and slightly sticky.
-
Fold in the Mix-Ins (First Round): Now, by hand with a sturdy spatula, fold in 1 1/2 cups of the graham cracker pieces, 1 1/2 cups of the mini marshmallows, and all of the milk and semisweet chocolate chips. Stir until they are evenly dispersed. Remember, we are reserving the remaining graham crackers, marshmallows, and the Hershey’s bar pieces for the top.
-
Scoop & Bake (First Phase): Using a cookie scoop or two spoons, portion the dough into 2-3 tablespoon-sized balls. Place them on the prepared baking sheets, leaving at least 2 inches of space between each, as they will spread. Bake for 10 minutes. The cookies will look puffy and just set around the edges but still soft in the center.
-
The Signature Topping: This is the magic step! Carefully remove the baking sheets from the oven. Immediately, press 4-5 additional mini marshmallows, a few extra graham cracker pieces, and a couple pieces of the broken Hershey’s bar onto the top of each hot cookie. The residual heat will start melting them instantly.
-
Final Bake & Optional Toast: Return the cookies to the oven and bake for an additional 1-2 minutes, just until the new marshmallows begin to melt. For that authentic toasted flavor: Switch your oven to BROIL on a high setting. Watch CLOSELY—this happens fast! Broil for 30-60 seconds just until the marshmallow tops are golden brown. Do not walk away! They can burn in a flash.
-
Cool & Set: Allow the S’mores Cookies to cool on the baking sheet for 3-5 minutes. This lets them firm up enough to handle. Then, transfer them to a wire cooling rack to cool completely. The marshmallows will be extremely hot at first, so exercise caution.
Pro Tips for S’mores Cookies Perfection
-
Butter Temperature is Key: Your butter should be cool to the touch but able to hold an indentation when pressed. Too cold, and it won’t cream properly. Too melted, and your cookies will spread too thin.
-
Chill for Control: If your dough feels too soft or your kitchen is very warm, cover the bowl and chill the dough for 20-30 minutes before scooping. This prevents excessive spreading.
-
Parchment is Your Friend: Seriously, don’t skip it. Silicone mats can also work, but parchment gives the bottom of the cookie a slight crispness that pairs wonderfully with the soft interior.
-
Broiling Safely: If broiling, keep the oven door slightly ajar and monitor constantly. Ovens vary widely, so the 30-second mark is a good time for a first check.
The Ultimate S’mores Cookies: A Gooey, Nostalgic Treat You Can Make All Year
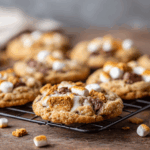
Bring the cozy campfire vibes straight into your kitchen with these soft, gooey S’mores Cookies! They’re packed with melty chocolate, crunchy graham crackers, and toasted marshmallows — all the best parts of a classic s’more in one warm, chewy cookie. Perfect for parties, movie nights, or whenever you want a sweet treat in minutes.
Ingredients
-
1 cup salted butter, softened
-
¾ cup light brown sugar, packed
-
½ cup granulated sugar
-
2 large eggs
-
1 tsp vanilla extract
-
2 ½ cups all-purpose flour
-
2 tsp cornstarch
-
1 tsp baking soda
-
1 tsp salt
-
2 cups mini marshmallows, divided
-
2 cups graham crackers, broken into small pieces (about 9–10 crackers), divided
-
½ cup milk chocolate chips
-
½ cup semisweet chocolate chips
-
2 Hershey’s bars, broken into pieces
Instructions
-
Preheat your oven to 375°F (190°C). Line 2 baking sheets with parchment paper.
-
In a large bowl, beat the butter, brown sugar, and granulated sugar for 2–3 minutes until creamy.
-
Add the eggs and vanilla, mixing until smooth.
-
Add the flour, cornstarch, baking soda, and salt. Mix until just combined — don’t overmix.
-
Stir in
-
1 ½ cups graham cracker pieces
-
1 ½ cups marshmallows
-
both chocolate chip types
-
-
Scoop 2–3 tablespoon–sized dough balls onto your baking sheets, leaving space for spreading.
-
Bake for 10 minutes, then remove from the oven.
-
Press a few extra marshmallows, graham cracker pieces, and Hershey bar chunks into each cookie.
-
Return to the oven for 1–2 more minutes, or until golden.
-
Optional: Switch to broil for 10–20 seconds to toast the marshmallows — watch closely so they don’t burn!
-
-
Cool on the pan for 2 minutes, then transfer to a rack.
-
Store in an airtight container for 4–5 days.
Notes
-
Don’t overbake: They should look slightly underdone — they set as they cool!
-
Bigger marshmallows? Cut them into smaller pieces so they blend into the dough better.
-
Messy cookies: Marshmallows may melt out a bit while baking — that’s normal and adds gooey goodness.
-
Want them extra soft? Add 1 extra teaspoon of cornstarch.
Storing Your Homemade S’mores Cookies
Due to the marshmallows, these cookies have a unique storage profile. Store them in a single layer (or with parchment between layers) in an airtight container at room temperature for up to 4-5 days. The marshmallows will lose their toast and become chewy over time, but the cookies will still taste delightful.
Can you freeze S’mores Cookies? Absolutely! For best results, freeze the baked and fully cooled cookies in a single layer on a baking sheet before transferring to a freezer-safe bag or container. They’ll keep for up to 3 months. Thaw at room temperature. You can also freeze the scooped dough balls; bake from frozen, adding a minute or two to the baking time.
Final Thoughts
Mastering the art of S’mores Cookies is about more than following a recipe—it’s about capturing a feeling. It’s the joy of transforming a seasonal, campfire-dependent treat into an accessible, shareable, and utterly irresistible baked good. This recipe succeeds because it honors the original s’more while embracing what makes a cookie great: soft chew, buttery depth, and a perfect sweet-salty balance.
Whether you’re serving them at a summer BBQ, packing them in a lunchbox for a sweet surprise, or simply satisfying a nostalgic craving on a rainy afternoon, these cookies deliver. They are a conversation starter, a guaranteed crowd-pleaser, and a testament to the fact that sometimes, the best innovations come from combining two beloved classics. So, preheat your oven, break out the graham crackers, and get ready to enjoy the magic of s’mores—no fire pit required.